FAQs
AppVirality as a platform is dependent on the fair understanding of a lot of keywords used in Digital Marketing, Analytics & Cross-Platform Mobile Technology. Hence we have felt the need to lay out a broad set of common questions that would help when you feel confused around something.
Here is a list of FAQs to begin with. We promise to keep updating this list on a timely basis.
FAQs Index
- Who is a ‘Referrer’?
- Who is a ‘Friend’?
- Who is a ‘Loyal’ user?
- What is MAU?
- What is the ‘Welcome Screen’?
- Where can I edit the ‘Welcome Screen’ text?
- How can I customize the look & feel of Welcome Screen?
- Why can’t I see the Welcome Screen?
- How to pull up and show ‘User Earnings’ in my own UI?
- How to Redeem Rewards?
- How to obtain Private Key, i.e. Secure Key?
- How to customize sharing text in Whatsapp and other social channels?
- How can I customize mini/pop-up notifications?
- Can I reward Referrers or Friends with coupon codes?
- How can I test my referral program?
- Why can’t I add a test device?
- How to configure email notifications?
- If no campaign is active, is there a way to hide the “Refer and Earn” item from the hamburger menu?
- How to launch Mini or Pop-up notifications in custom screens?
- How to enable Custom Domain for the Referral URL?
- How to ensure that Existing Users are not rewarded when they initiate a re-install?
- How does AppVirality detect an install based on the Referral Link click?
- How can I add my team members to the AppVirality dashboard?
- Why do I get a different Referral URL for each social channel share?
- How to edit referral screen title and description, that my users see on the mobile app?
- LogOut & LogIn Callbacks for Apps
- What is implied by K-Factor?
- How is Revenue calculated on dashboard?
- Review Period & Redemption Cap
- How to Customize the Referral Code
- What happens to the Old Referral Code once a User Changes/Customizes the Referral Code?
- Why Facebook Share Image not getting updated while sharing my Referral Link?
- Why Register conversion event call fails?
- Why updated campaign details are not reflecting/updating on mobile screen?
- How can I use third party attribution channels(Apsalar, MAT, Appsflyer) to track install?
- Can I use my Gmail account to send email notifications to users?
- How referral code gets generated?
Any person/user who uses the in-app referral feature to influence more people to install and use the app is a Referrer.
This term is a placeholder for pointing towards any user who has generated such conversions via in-app referrals, in the context of AppVirality’s offerings
When someone joins your app – using a referral link i.e. under some existing user’s influence, the new user is classified as a Friend to the original Referrer.
This term is a placeholder for any user who has been acquired via an in-app referral link, in the context of AppVirality’s offerings
Who is a ‘Loyal’ user?
Any existing user, who participates in regular activity on your app – and qualifies all parameters of your app’s loyalty rules (as may be defined in the Loyalty program reward rules configuration – is a Loyal user.
This term is a placeholder for any user who has qualified all rules of Loyalty in your app, through his/her in-app activity, in the context of AppVirality’s offerings
MAU is an acronym for Monthly Active User. This is a measure of the usage/engagement of your application. To break it down, MAUs denote the number of users who have used or interacted with your application at least once in a period of one month.
Example:
For the month of June, if you have:
| User ID | # Interaction with Application | Active (Yes/No) |
|---|---|---|
| User A | 42 | Yes |
| User B | 21 | Yes |
| User C | 0 | No |
| User D | 4 | Yes |
| User E | 53 | Yes |
| User F | 0 | No |
| User Z | 9 | Yes |
According to above application stats, Users A, B, D, E, Z were the only ones active on your app for June.
Hence your application’s MAUs for June were 5.
An MAU is thus a good metric to estimate the active user base in your application – compared to the total users signed up.
For additional references: Investopedia | Wikipedia
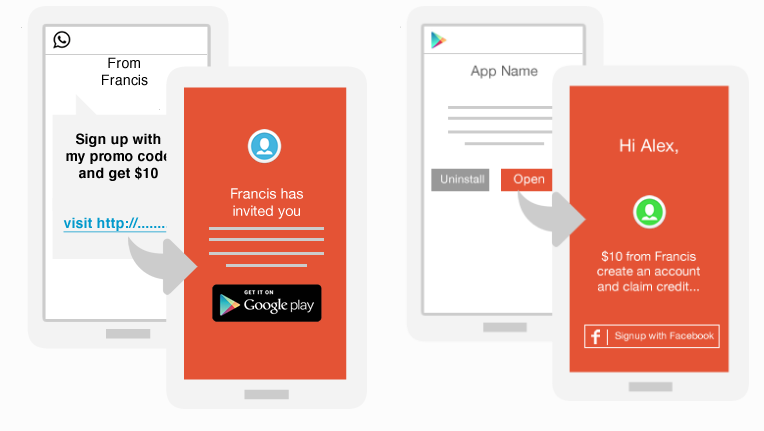
A welcome screen is an app level customization to engage new users / friends, as a part of the in-app referral program. If configured, it shall be the first screen to greet friends who installed through referral link. It is an effective method of communicating the incentive pledged to the user, acquired via this growth hack.
Example of a welcome screen
The initial text in the Welcome Intent page/screen is pre-populated based on the reward rule which has been configured in the 1st step of the Campaign configuration.
However, you may choose to customize this as per your requirement. Navigate to:
Dashboard >> App Details >> Find the Relevant Campaign >> Click “More” >> Click “Landing Pages” >> Scroll down to “Configure In-App Welcome Message” text box
Here, you can replace the existing text with whatever custom text you would like to display.
You can use the following Replacement Tokens for personalizing your messages too.
| Keyword | Definition |
|---|---|
| {{profile_image}} | User Profile Image |
| {{username}} | User Name |
| {{app_icon_url}} | App Icon URL |
| {{app_description}} | App Description |
| {{app_store_url}} | App Store URL |
| {{play_store_url}} | Play Store URL |
| {{windows_store_url}} | Windows Store URL |
The Welcome Screen UI is connected & controlled by WelcomeScreenActivity.java class and activity_welcome_screen.xml layout files in the AppViralityUI module.
Launching the Welcome Screen should be a cakewalk and hence modifying the layout should not be a biggie either, now that you know which layout resource you must modify!
You may use the resource list on How To Customize the UI elements available in AppVirality’s SDK, for more details.
If the welcome screen seems missing– there are a few things you must cross-check.
- Make sure you are launching the WelcomeScreenActivity from AppViralityUI module, after initializing the AppVirality SDK and checking the conditions to display welcome screen
- Is this the foremost interaction of the User with/on the app – immediately after the app has been installed?
- Has the user used or acted upon a Referral Link, which made him install the app?
If the above three conditions have been checked for, you should check if this app was previously installed to this device, and may have been uninstalled. In such a case, the incentive or reward pledged does not stand to be effective.
By the way, you can always customize the Welcome Screen Message by navigating to:
Dashboard >> App Details >> Select Campaign >> Click More >> Landing Pages >> Configure In-App Welcome Message
AppVirality provides a API feature which one may use.
The API can be accessed via host: https://api.appvirality.com
Please note all the dates being served in the API, are in UTC±00 Time zone
For showing user relevant info, we provide an API call.
Check out how you can Get User Balance i.e. Friend/Referrer
Note that User Earnings are shown by default as part of the Earnings section under the Share Intent Screen i.e. the Referral Screen. You may customize the UI elements in the SDK to show the same resource wherever you want in your app too.
AppVirality provides a API feature which one may use.
The API can be accessed via host: https://api.appvirality.com
All the dates being served in the API, are in UTC±00 Time zone
Note that, in the case of using coupons, AppVirality does the entire work of issuing/distributing. It is only when you are using In-Store Credits i.e. Wallet as the chosen mode of reward that you need to make these service calls via the API.
When it comes to redeeming rewards, you should use Redeem Rewards API call.
This key will help with a Key value that is necessary to setup a secure connection of the Webhooks.
AppVirality enables you with Webhook connectors for handling rewards, and updating their statuses on a synchronous basis. To obtain the same, navigate to:
Dashboard >> App Details >> App Settings >> Scroll down to Advanced Settings >> Private Key
You can regenerate a private key here itself.

This key must be fed as the Secure Key when you are configuring the Webhooks.
AppVirality gives you the flexibility to set different sharing text/copy for each type of social channel. You can do this from the dashboard directly.
In your dashboard under the App Details section, select the Campaign you want to edit.
Click on Edit, and scroll down to the Social Channel Selection section, click again on edit option against whichever social channel text you would like to customize.
Remember to keep an eye on the Display Order against each social channel when you edit them. This number determines in what order they shall show up in the Share Intent Screen inside your app when the In-App Referrals are launched by the end users.
You can change the share text for all your social channels directly from this section.
You must relaunch the Share Intent Screen – for the changes in the campaign done to be reflected in the app’s referral screen.
When you relaunch – SDK tries to fetch the latest campaigns data if it was last fetched more than 30 minutes before, which enables a refresh for the campaigns data accessed by the app.
You may customize and design mini/pop-up notification while running an In-app referral growth hack campaign.
- From the App Details section in the dashboard, select the Campaign for which you would like to customize min/pop-up notifications.
- On this campaign click the More button
- Now click on Advanced Settings
- Scroll down to Launch Widget Configuration
- Here you may design the mini or pop-up notification as you please using the various in-house options likebackground color, message color, button color, iconography, etc.

Yes absolutely! When you use coupons, AppVirality will do the job of delivering the coupon codes to the user, as and when a specific conversion event is triggered.
You have to declare/configure the coupon pools for this to work.
For a detailed understanding, go to Reward Configuration
A very comprehensive way of handling this is stated well in the section:
TESTING A REFERRAL CAMPAIGN
Foremost, you have to identify two test devices and create a campaign.
Next, navigate to the Testing section on your Dashboard.
Add both the test devices in this page, simply following the instructions as given there.
Now you can begin with testing the referral program.
Using one device as the referrer, share the referral link for the app across any chosen channel.
Use the other device as the friend in this scenario, and access the app installation link by tapping onto the shared referral link. After installation, the friend would be prompted with a welcome screen with a welcome intent text, upon the 1st app launch.
To validate the activity further, navigate to Analytics and observe the metrics. Invites, Clicks, and Installs should have got increased by 1 each. Additionally, you would see an entry in the Referrer/Friend Rewards tab, depending upon what kind of reward rule you may have declared.
For example, if a reward rule set looks like:
- Reward Referrer with $50 when a friend signs up.
- Reward Friend with $25 when he/she signs up.
- Reward Referrer with $10 when Friend makes a purchase worth $100.
- Reward Friend with $5 when he makes a purchase of 150 or more.
If you are struggling to add your test device – one or many of these may be the causes!
- Your test device has a malfunctioning set of sensors.
Before you frown on us, let us tell you we faced this too when we chose to use old devices as test devices, so that we could keep things frugal/cost-effective. - You may not have any live campaign against the app in the dashboard. You cannot really test a campaign without ever creating one, right?
- Check the App Key for the installed app. Do you have the same apk file installed in your test device, as has been added in the app details on the dashboard?
- Have you launched/opened the app, when trying to add the test device ( i.e shaking the device 3 times, whilst the app is open)
A detailed explanation on the above topic is available under Troubleshooting: Test Devices
Begin by adding/configuring an Email alias to send the mail notifications to users. Navigate to:
- App Details on your AppVirality Dashboard by clicking on left menu,
- Click on App Settings
- Switch to EMAIL tab
- Click on + Add
Add the relevant details & save. This will configure the Sender email for the mail notifications being sent to your users.

To configure the Email Notifications, navigate to:
- App Details on your AppVirality Dashboard by clicking on left menu,
- Select the desired campaign from the available list (these are the ones which are either in Drafted or Live status, implying that these are the only ones which you may have created – even if partially)
- Click on More, an array of new options shall show up
- Click on Notifications
- Switch over to the Mail Notifications tab

Navigation: Dashboard >> App Details >> Select Appropriate Campaign and Click on More on the campaign card >> Click on Notifications >> Switch to Mail Notifications tab
Next
Navigate to Create E-mail Templates and select the email template you need, and switch the Status as ON for that particular template. Then enter the other details as relevant
You are free to set up as many or all of the notification types as you feel.
You can configure your own set of custom email templates too.
Remember to save after each such configuration.

Of course! The ideal manner is to have a custom button – “Invite Friends” or “Refer & Earn“.
Follow through to the below link & you shall know how such a use-case could be handled.
Launch Referrals On Custom Button Action
Using Mini or Pop-up Notifications can be a stellar way of personalizing the user experience.
Follow the link down under & you can see how that is done – from an integration perspective.
Launch Referrals from Pop-up or Mini Notifications
You can configure the notification style and the message from your AppVirality Dashboard.
You can control the visibility of this notification from the dashboard.(i.e. By setting launch conditions like after how many app launches you want to show the notification or after how many days of the first install you want to show the notification).
To do so, navigate to the User Targeting parameters(Dashboard >> App Details >> Select Campaign >> Click on More >> User Targeting) & set your dynamics in the WHEN & HOW OFTEN section
Your App Referral URL can be customized to broadcast your brand domain name
To enable the custom domain name usage instead of the default http://r.appvirality.com for the Referral, navigate to the App Details and click on App Settings.
Switch to “Advanced Settings” tab and enter your desired domain extension in the Custom Domain field

If you want to use canonical domain names (CNAME) for the custom domain, add your CNAME record in yourdomain DNS settings to show your custom domain name in social action share URL(i.e. Referral URL). This is simply about pointing your CNAME record to “r.appvirality.com“.
To make things simpler, if your domain is “example.com” and you would like to see your referral links or share url’s starting with this domain “r.example.com“, then add CNAME record with host name as “r” and point to “r.appvirality.com”
To ensure such a thing, you should set the property isExistingUser as TRUE using the setExistingUser(isExistingUser) method of UserDetails class while initializing the SDK or updating the user info.
isExistingUser(TRUE) notifies the AppVirality servers that the particular user is an old user (i.e. existing before AppVirality SDK integration), which we update against the user in our backend.
Set this TRUE only for the users before AppVirality Integration.
If you do set it TRUE again in subsequent initialization or update user info calls, then it will override all the existing rewards of that user to Rejected status.
So be careful – and note that this is a one-time activity only.
AppVirality has a proprietary device fingerprinting technique which it uses to tag/identify every unique install. This works pretty much similar to how most popular app attribution networks employ device fingerprinting, around the world (like Appsflyer, MAT, Apsalar, etc.). This Quora piece is worth a read!
The algorithm employed is unique to all platforms, but the idea is to create a User Key for each business user identified based on a collection of device & user parameters like IP, device ID, advertising ID, OS information, browser timestamp, user email ID, and many more.
Adding team members is the easiest on the AppVirality Dashboard.
From the Dashboard, navigate to App Details from the hamburger menu.
Now, Click on the green App Settings button. Here switch to the TEAM tab.
Here, add the email ID of the team member you would like to add & assign an appropriate role for him. That’s it!

About USER ROLES
This is in relevance to the TEAM tab in the App Settings described above. This would be a short note regarding the user roles & their meaning.
Administrator: Has full access to all section of the platform. Only an Administrator can add Team members.
Support: Has a Read Only access to Analytics & Logs. This is an appropriate user role for someone who is dedicated to monitoring the performance of the campaign only
We keep getting asked this very often. People ask us all the time:
” Why is there a different share URL for each time I share to someone through a different social channel, like for Facebook sharing the URL is: “http://app.myawesomeapp.com/fxk6p/4” and for WhatsApp sharing it comes out as “http://app.myawesomeapp.com/fxk6p/5” – all for the same referrer! “
Actually, the Referral link does not change. In context to the above example – the link would be: “http://app.myawesomeapp.com/fxk6p” It gets appended with an identifier, typically a numeral – which is tuned to a specific social channel – based on the order of selection as designed by you on your AppVirality Dashboard during campaign creation (Dashboard =>Campaign => Edit => Social Action Selection). This helps AppVirality keep a tab on each and every share/referral ever made. The analytics and attribution data of every Referral that leads to a successful conversion are dictated by this append.
Going forward, if you see the /1 or /2 or /3, etc. at the end of the referral URL, you will know to ignore that 🙂
This is easiest done when you navigate to editing the Campaign & preview it using the Preview On Device button.
Navigation:
Dashboard >> App Details >> Edit desired Campaign >> Scroll down & Click Preview on Device

Note that this will work even if you have changed the Referral Screen layout by customizing the UI elements of the Referral screen.
Helps you handle the tricky case of Login/LogOuts for user in app in conjunction with Referral system
This is an important callback implementation and it is crucial to app that allow their users to LogIn & LogOut through multiple devices. This implies that the Referral data, i.e. earnings, rewards, invite codes, etc. should remain aligned to whichever device the user logs in from.
Again, multiple users login and logout with different email IDs use a single mobile device. In such cases handling fraud becomes a difficult task. Usually, referral programs are designed by treating the mobile device as personal, therefore tightly linked up with a user until the device is reset. With this assumption, all the device parameters are cross checked before rewarding the user.This is to make sure that existing users are not treated as new users.
However, for apps having a ‘Login/Logout’ feature and allowing multiple users to use the same device, we can’t tightly couple the device with single user. Hence we would struggle if we use device parameters for fraud verification.
To deal with such a situation, we recommend using OTP checks, to deal with fraud.
AppVirality handles such situation by providing two SDK methods. These SDK methods need to be executed when a user clicks on Logout button.
PREREQUISITES FOR APPS RUNNING REFERRALS ALONG WITH LOGIN/LOGOUT FEATURE
- Having OTP verification in Refer & Earn screen, so that the verification would get completed even before a user starts to refer his friends.
- Reach out to AppVirality support and ask them for necessary fraud checks to be disabled to allow multiple users to use a single device.
- Implement the following method on the Logout button click event, to allow multiple users to use single device.
appVirality.logout();
In viral/referral marketing, the K-factor is commonly used to describe the growth rate of websites or mobile apps.
The formula is roughly as follows:
i = number of invites sent by each user (e.g. if each new user invites five friends, i = 5)
c = percent conversion of each invite (e.g. if one in five invitees convert to new users, c = .2)
k = i x c
Calculating K-factor of your referral campaign in AppVirality
Let’s say following are your referral campaign metrics
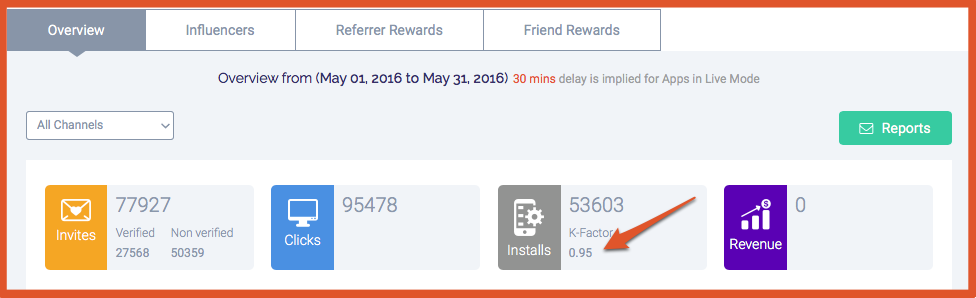
Invites: 77927
Installs: 53603
Total users participating in this campaign: 56458 (You can get this figure from Influencers tab)
K-factor (K) = i x c
Let’s find i & c for your campaign
i = number of invites sent by each user (Invites/Users = 77927/56458 = 1.3802)
c = percent conversion of each invite (Installs/Invites = 53603/77927 = 0.6878)
K = i x c = 1.3802 x 0.6878 = 0.9493
K = 0.95 (round off)
Revenue is calculated with the help of transaction conversion events, it is the total sum of amount for all the transaction events made by the Friends(users acquired through Referral Program) in a particular time period as selected on the dashboard. For instance, if you will be viewing Analytics for a week, revenue would be the sum of transaction values for the transaction events made by the Friends in that week.
Revenue is calculated only if you send us the transaction conversion events with the amount of transaction value for the transactions made by a Friend on your app. It helps in tracking the business growth and value generated by the new users acquired through the Referral Program.
Explains what is implied of Review Period & redemption Cap, under AppVirality. Examples used to explain scenario where they could be useful
Both are defined during Campaign creation process and can be edited from the same place, at any time.
Navigation: Dashboard >> App Details >> Select Campaign >> Click Edit >> Scroll Down below Reward Rules
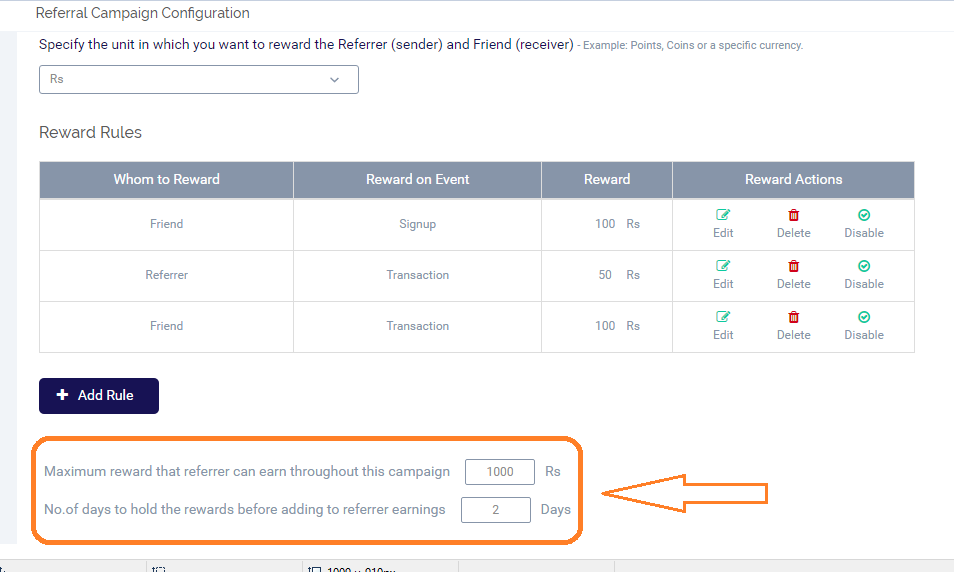
REVIEW PERIOD
The Review Period is something we assign to a Campaign, and is put to ensure that there is a buffer time between the completion of a Conversion Event and the time when the user receives the reward.
For example: User orders a toy, and is now eligible for reward, towards the transaction he made.
If he receives the reward immediately, and then chooses to return the product – he ends up getting reward earnings & his transaction spend – thus making the Company pay/reward him for doing nothing.
These types of frauds can be tackled by ensuring a Review Period which keeps the rewards on hold till that time period.
REDEMPTION CAP
Similarly, Redemption Cap enables you to ensure that the user does not get rewarded beyond a limit of earnings. This ensure you do not overshoot your budget for per user acquisition.
For example: Say the Redemption Cap is set at 1000 Rs, then once the user has earned a 1000 Rs – AppVirality will not tag the user to be eligible for further more rewards and his reward tab would be saturated.
His referrals shall still work, which implies any more friends who join using his Referral Link shall be able to avail the scheme as per campaign rules – just not him.
The test app provided with the AppVirality SDK 2.0 has a pre-implemented feature that allows users to modify/customize their Referral Code. This sort of personalization is the current fashion when it comes to Referral Codes.


The above Referral Code customization can be added as a standalone feature for your Referral program too, as and wherever you please.
As described above, make sure you have a field to receive the new custom Referral Code.
After the user enters the Referral Code and commits to customize it (by a click action on a Button like Save etc.), send the newly entered Referral Code to the AppVirality SDK through the below mentioned method:
  appVirality.customizeReferralCode(newReferralCode, new AppVirality.CustomizeRefCodeListener() {
   @Override
   public void onCustomRefCodeSet(boolean isSuccess, String errorMsg) {
       try {
           if (isSuccess) {
               // Referral Code changed successfully. Update the same in your
               // local campaign details instance.
           } else {
               // Referral Code couldn't be changed, check errorMsg to know
               // the cause of failure.
           }
       } catch (Exception e) {
       }
   }
});
Please ensure that the newly entered Referral Code is not more than 10 characters long.
It could help to alert the user about the 10 character limit when the user engages in this activity
Both the Referral codes shall work independently. The new Referral code would not render the old one as redacted or foiled.
Allowing users to enjoy the small pleasures of modifying their Referral code/link engages them better, and AppVirality ensures that it retains the existing user experience – while handling all other technicalities in the background.
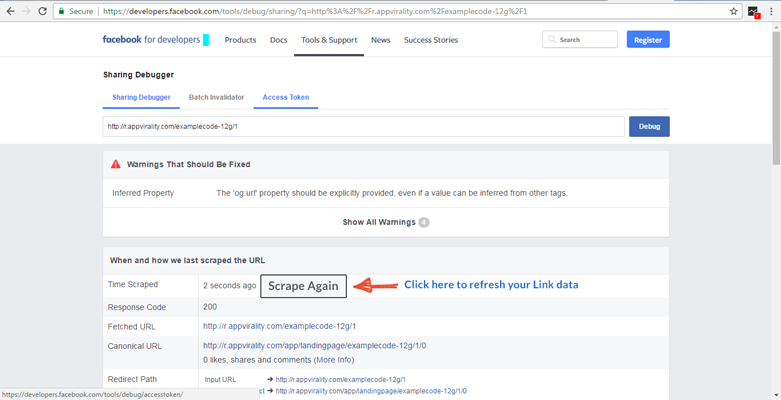
Facebook caches the Referral Link and its associated meta data due to which the share image configured for Facebook/Messenger may not get reflected while sharing your Referral Link, it may take up to few days for it to get auto-updated so if you want the changes to take effect immediately you will have to refresh the meta data associated with your Referral Link using Facebook Sharing Debugger.
Follow the below steps to refresh the meta data:
-
- Browse to the Facebook Sharing Debugger, enter your Referral Link there and click on Debug.
- If the entered Referral Link hasn’t been shared on Facebook before, it will display a Fetch New Information button, click on it.
- Now it will display the Link related data along with the Share Image, click on Scrape Again a few times until you see the new image set by you on the AppVirality dashboard.
Why Register conversion event call fails?
In order to identify Why Register Conversion Event has failed, you have to check the below three cases:
Case1.Referrer and friend should be attributed:
If referrer and friend were not attributed then registerconversionevent call returns success as false.
To check whether friend and referrer were successfully attributed or not, go to query resolution under Analytics tab, enter referrer and friend email ids and click on Find Resolution button. If the attribution was successful, it would display messages as below:

Case2: Event name in registerconversionevent call should match with any one of the events added in campaign for friend or referrer:
If the event name in registerconversionevent call didn’t match with any one of the events added in campaign then registerconversionevent call would return success as false.
Verify the events added in the campaign by clicking on edit button in the campaign:

Case3.Need to check whether we have already rewarded for that conversion event or not:
Go to Query Resolution under Analytics tab, enter referrer and friend email ids and click on Find Resolution button, if already rewarded it will display conversion events received else not received, as shown in the below screenshot:

If you are sending the registerconversionevent call for an event which has already been received then registerconversionevent call will return success as false.
registerconversionevent call for Transaction event will return true or false based on the frequency you select for the transaction event in the campaign.
Case4.Need to check transaction value in the registerconversion event call on transaction:
Register conversion event call on transaction fails when transaction value is not more than or equal to the Minimum transaction value mentioned while configuring the reward rules.
Suppose if you have given the Minimum transaction value as 500 then the transaction value in the register conversionevent call should be more than or equal to 300 then only the registerconversion event call on transaction will be successful.

Campaign details will be cached by SDK on mobile device and cache will be refreshed after every 30 minutes on subsequent launches. Hence you will observe 30 minutes delay.
you can plug in your Third Party Attribution & auxiliary Analytic services, like Apsalar, MAT, Appsflyer.
Generate a Third party tracking link (Apsalar or MAT or Appsflyer) by selecting Appvirality.Provide this third party tracking link in the Campaign Advanced settings–>Advanced Url Settings

The way this would work is, for every click on the referral link, AppVirality –basis the device from which click was generated – would redirect the user to the link configured against the device type in this section.
Referral code is generated using first four alphabets of user name concatenated with random alphanumeric characters not exceeding 10 characters. In case user name isn’t sent to AppVirality on init then it uses first four alphabets of App Name followed by some random number.