Set up Test Environment
Testing your Referral Campaign is a critical step towards going live & publishing it on your app.
The steps here would only be able to help you set up and get started with the testing.
The onus to build specific use-cases, and thereby conducting regressive testing (to ensure all fail safe is met) remains upon you.
Referrer & Friend Devices
Here on, for the sake of better comprehension, let us treat/call the devices as:
device A = Referrer
device B = Friend
Before you proceed with the Testing regime for your App Referral, make sure you have cross-checked the Testing Prerequisites for the integration on Android or iOS. This would require you to add certain meta-values to your Test App build.
Make sure you have some way to access the Test App from your device without depending on the Store; be it via Local folders, Bluetooth, or the Cloud.
Your Test App would NOT be the same as your app hosted on Play Store or App Store.
This understanding is crucial in your test approach.
Hence in all your test cycles, you shall follow all steps and emulate a user journey – till just ahead of the point of downloading/installing app from the platform’s respective Store.
Do not click/act on the Install/Download link there. Instead you shall switch to the alternate source where you would have stored your Test App, and install this APK only.
Test App vs App from Store
During Testing, do not install app from Store (after clicking on Invite Link).
Instead install the Test App only.
Install the Test App on both(or as many desired) test devices. Also, ensure you have them accessible as bundles, to install them as and when required.
STEP 2 Adding Test Devices to Dashboard
Default Method
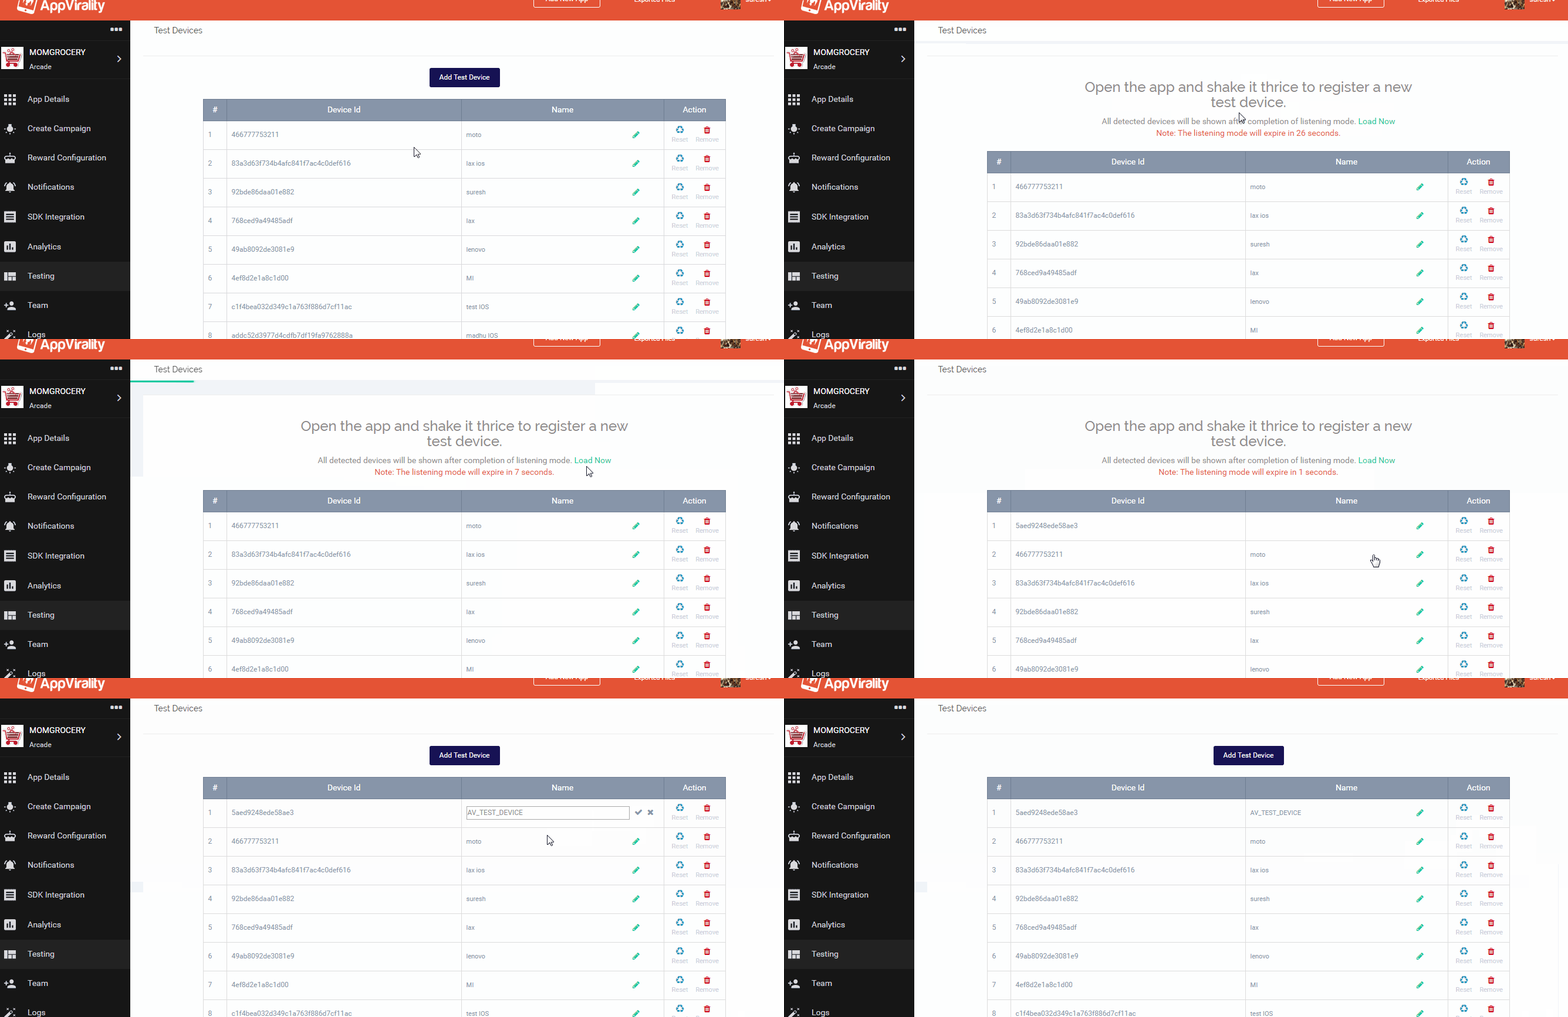
- Navigate to the Testing section in your AppVirality Dashboard
Dashboard >> Testing

- Click on Add Test Device button
- Follow the screen prompt: Open the app in your test device, & Shake it thrice
- Once done, click Load Now on the page and your device should have been added as a nameless one at the top of the list. Rename the device based on context for your ease i.e. Referrer device = Device A, etc.
- Repeat the same above steps with the other device(s)
Among many causalities to that (like faulty accelerometer on device, etc.), the basic explanation is:
The SDK does not receive the Shake event or its acknowledgement from the device.
Hence, the relay between SDK and our servers does not acknowledge the shaking of your device – thereby not adding your device as a Test Device to the dashboard.
In such a case, you can use this workaround for adding the Test Device:
- Install the app to your device, and login using a known email ID, say abc_test@testing.com
- Now open the app, launch the Referral Screen and share the app via any of the social channels you can get your hands on Click to see how
- Navigate on the Dashboard to the Analytics section, open the Influencers tab and search for the email ID used to login into the app i.e. abc_test@testing.com Click to see how

Influencer Search - Click on the info icon to view the user/influencer details.
You will find the Device ID listed among them.
Copy & retain it Click to see how
Get Device ID - Use the Add a Test Device API call to add the device as Test Device, while
Opening the Test App and sharing it is mandatory in this step. If you skip doing this, no records are generated for your Device in the Influencer section, and hence finding the Device ID will become rather impossible.
This is done to emulate a real life scenario where the Device A has the app already, but the Device B is fresh with no attribution to the app.
- Uninstall the app from the device you choose as a Friend device i.e. Device B
- Navigate to Device B in the Test devices list, and Reset it.

Ideally, you should uninstall the Test App from Device A too and reset it all the same. This clears any chance of attribution on both devices. Once you have reset both, make sure you re-install the app on Device A i.e. the Referrer device.
The Test Environment setup is complete now
To summarize what we did so far & why:
- We have prepared the Test Devices, by adding/installing the Test App
- This was done to enable us to register the Test devices on the Dashboard.
It white-lists the device from the AppVirality Fraud Prevention Algorithm which runs on the background for all general activity - We then uninstall the app from the Friend’s device.
This makes us ready to share the app from the Referrer Device, to the Friend. - The Friend then undertakes the ideal user journey in a Referral workflow – except installing the app from the Store. The Test App resident in the device is then installed to emulate & complete the user journey in the Referral schema.
Going forward, we will explain how to run a basic Test Cycle of the Referral Campaign setup.