Integration Steps
A comprehensive guide to integrate your Android app with AppVirality’s Android SDK.
The new SDK v2.0 for Android now enables you to run a Loyalty program in tandem with your In App Referrals.
If that wasn’t good news enough, the SDK v2.0 has been improved on all fronts – thus making it leaner, sharper and way more seamless in the integration.
Getting Started
Going forward, we shall be denoting the invitation or referral sender as ‘Referrer‘ and the receiver or beneficiary as ‘Friend‘. The integration is very straightforward.
Copy AppVirality SDK Jar to the libs folder of your application, and then add it as a file dependency for the application module.
OR
Use Gradle dependency for SDK , If you want to build your own UI. Add the following line to your app-level build.gradle.
compile 'com.appvirality:AppViralitySDK:2.0.11'
ELSE
Use Gradle dependency for SDK + UI , If you want to use default UI with basic customization like colors and background images. Add the following line to your app-level build.gradle.
compile 'com.appvirality:AppViralityUI:2.0.11'
If you want to completely customize the default UI, please download the AppViralityUI library project and edit the xml layouts by following UI customization help guide.

As mentioned earlier, once you’ve registered with appvirality.com and added a new app, you shall have an App Key
Navigate to find these keys from your AppVirality Dashboard (image enclosed):
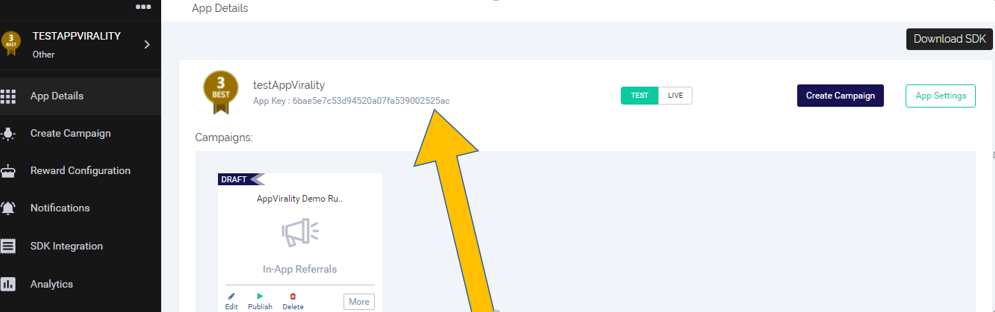
Kindly use the same APPKEY for all platforms
If you have registered your iOS Application already and want to run the same referral campaign on Android App as well, do not register the app on AppVirality again, separately. Use the same App Key obtained from the initial registration.
Add the following sub-elements to the manifest element of your AndroidManifest.xml.
Replace “02e1r5e99b94f56t69f42a32a00d2e7ff” with your AppVirality App Key
<application android:label="@string/app_name" ...>
    ...
    <meta-data
        android:name="com.appvirality.sdk.AppViralityApiKey"
        android:value="02e1r5e99b94f56t69f42a32a00d2e7ff" />
    ...
</application>
Set value as true or false, depending on whether you want to run the app in Test Mode or Live Mode respectively.
Test Mode allows you to add Test Devices in AppVirality Dashboard. You can reset test devices from dashboard, enabling them to be reused as a fresh device again. For more on how to add test devices visit.
Going Live: Reset Test Mode
Ensure that you reset the value as false before publishing the APP to the Play Store.
Failing to do this will make only a Test App to be uploaded.
<application android:label="@string/app_name" ...>
    ...
    <meta-data
        android:name="com.appvirality.sdk.TestMode"
        android:value="true" />
    ...
</application>
Add the following permissions to your AndroidManifest.xml.
<manifest..>
    <uses-permission android:name="android.permission.INTERNET" />
    <uses-permission android:name="android.permission.ACCESS_NETWORK_STATE" />
    <!-- Optional permissions. WRITE_EXTERNAL_STORAGE and READ_EXTERNAL_STORAGE
    are used to improve the performance by storing and reading campaign images. -->
    <uses-permission android:name="android.permission.WRITE_EXTERNAL_STORAGE" />
    <uses-permission android:name="android.permission.READ_EXTERNAL_STORAGE" />
    <!-- Optional permissions. READ_CONTACTS is used to read device contacts for
    implementing InviteContacts social action. -->
    <uses-permission android:name="android.permission.READ_CONTACTS" />
...
</manifest>
AppVirality ensures attribution of devices based on a proprietary device fingerprinting technique that creates a User Key for every business user as a hash of multiple device & user parameters. This notwithstanding, AppVirality uses Google’s INSTALL_REFERRER receiver for attribution as a fallback, in addition to device fingerprinting.
Add the following code block if you don’t have an INSTALL_REFERRER receiver in your manifest.
<receiver
    android:name="com.appvirality.AppViralityInstallReferrerReceiver"
    android:exported="true">
    <intent-filter>
        <action android:name="com.android.vending.INSTALL_REFERRER" />
    </intent-filter>
</receiver>
For more options on enabling Install Referrer Receiver(s), take a look at:
under Advanced Configurations
Declare following activities if you are using AppViralityUI dependency.
With GrowthHackActivity.java, you must either use AppViralityTheme as the theme or create a new style extending AppViralityTheme as its parent, modifying the style attributes values as per your requirements and then use this theme.
<activity
    android:name="com.appvirality.appviralityui.activities.GrowthHackActivity"
    android:theme="@style/AppViralityTheme" />
<activity android:name="com.appvirality.appviralityui.activities.WebViewActivity" />
<!-- Optional. Required only if you want to show Welcome Screen to the new user. -->
<activity
    android:name="com.appvirality.appviralityui.activities.WelcomeScreenActivity"
    android:theme="@style/AppTheme.NoActionBar"
    android:windowSoftInputMode="stateHidden" />
<!-- Optional. Required only if you want to use InviteContacts social action. -->
<activity
    android:name="com.appvirality.appviralityui.activities.InviteContactsActivity"
    android:screenOrientation="portrait"
    android:theme="@style/AppViralityTheme" />
Copy the following style in your styles.xml to create a NoActionBar theme.
<style name="AppTheme.NoActionBar">
    <item name="windowActionBar">false</item>
    <item name="windowNoTitle">true</item>
</style>
For posting campaign image with the invite message on some social networks, you need to share the image with the corresponding social network app. As Google recommends using Content URI, you need to declare the same in your app for sharing the image’s Content URI with such social network apps. To do so follow the below two steps.
Create file provider_paths.xml under App -> res -> xml folder and declare the path inside it where you are storing your campaign images. If you are using AppViralityUI module or storing images in external storage you can use the below code else please check out this link to find the proper declaration for your storage directory.
<?xml version="1.0" encoding="utf-8"?>
<paths>
    <external-path
        name="external_files"
        path="." />
</paths>
Now declare the above created provider paths file in your application manifest. To do so please copy the below code in your application manifest under <application></application> element.
<application android:label="@string/app_name" ...>
    ...
    <provider
        android:name="android.support.v4.content.FileProvider"
        android:authorities="${applicationId}.provider"
        android:exported="false"
        android:grantUriPermissions="true">
        <meta-data
            android:name="android.support.FILE_PROVIDER_PATHS"
            android:resource="@xml/provider_paths" />
    </provider>
    ...
</application>
Before actually initializing the SDK we need to create the AppVirality class singleton, which is the main class in the SDK – needed for various SDK operations.
Create AppVirality class singleton in the onCreate method of either your app’s Application class or the launcher activity.
The best way to instantiate this class is in your app’s Application class so that all the required SDK classes will get instantiated by the time user will be redirected to the app’s home screen. Use either of the following code for the same:
import com.appvirality.AppVirality;
...

AppVirality appVirality = AppVirality.getInstance(this);
OR
Use the below method if you want to configure any properties for the SDK using Config class.
 import com.appvirality.AppVirality;
 import com.appvirality.Config;
 ...

 Config config = new Config();
 // config.printLogs = true;
 // config.runEmulatorChecks = true;
 // config.runRootChecks = true;
 appVirality = AppVirality.getInstance(this, config);
Use the same above method to retrieve the already initialized singleton throughout your application.
Setting/Updating the users’ details is an important step. This is how AppVirality would be aware of the identity of a business user as classified by your app. This is important and impacts things like: personalizing the referral messages, welcome screen – shown to new users on the 1st session/open post app installation.
Friends get to see the referrer’s name and profile picture, an important personalization which leads to better conversions & engagement in your user base. AppVirality will also pass these user details through web-hooks to notify you on successful referral or conversion (install,signup or transaction etc.)
Step 1 Create a UserDetails class object and set the various user details to recognize the user same as your back-end system.import com.appvirality.UserDetails; ... UserDetails userDetails = new UserDetails(); userDetails.setReferralCode(referralCode); userDetails.setAppUserId(userId); userDetails.setPushToken(pushToken); userDetails.setUserEmail(email); userDetails.setUserName(name); userDetails.setProfileImage(userImage); userDetails.setMobileNo(mobileNo); userDetails.setCity(city); userDetails.setState(state); userDetails.setCountry(country); userDetails.setExistingUser(isExistingUser);
Identifying Existing Users
Set setExistingUser property as TRUE only on first App launch i.e. only once.
On subsequent launches please don’t set this property. At any point of time, excluding the first time, if you set this property to TRUE all the existing user rewards will be set to Rejected state and would also stop reward on future events. Use this property carefully and with caution!
It is advised that you INITIALIZE the SDK in the Login Screen, so that we may ensure a smooth user experience. This helps ready your campaigns in the background while your app loads all its resources.
Use the following code to initialize the SDK:
import com.appvirality.AppVirality;
...

appVirality.init(userDetails, new AppVirality.AppViralitySessionInitListener() {
    @Override
    public void onInitFinished(boolean isInitialized, JSONObject responseData, String errorMessage) {
        // responseData will have an extra parameter 'isNewSession' as true
        // whenever a new session is started using this callback.
        Log.i("AppVirality: ", "Is Initialized " + isInitialized);
        if (responseData != null)
            Log.i("AppVirality: ", "userDetails " + responseData.toString());
    }
});
For more details on above mentioned callback’s responseData view.
MUST DO: Call INIT Method, upon EVERY App Launch – with user Email ID
Make sure to invoke the init() method on every app launch, if the SDK has been initialized, which you can check by calling isSessionInitialized() method of the AppVirality class, which would return True if the SDK has got initialized else False.
Please ensure you are doing so with the user details you get during Signup/Login.
Launching the Growth Hack is something which can really vary from app to app, and be hugely dependent on the use case & flow of the app. This is a very big reason why we see a new type of growth hack launch for every new app.
Launch from custom button i.e from Invite Friends or Refer & Earn button on your App menu, however show Button (i.e. Invite & Earn button) only upon campaign availability.
You can control the behaviour of your Growth Hack button, i.e. Invite & Earn button – by checking for the campaign’s state & thus controlling the Growth Hack launch.
You can use the following method if you want to show some label or message bar, only if there is any campaign available for the user.
CampaignDetailsListener will get called irrespective of campaign availability; but if campaign is not available the onGetCampaignDetails method shall receive an empty campaign list.
This is mainly useful when you want to have some control over the “Invite” or “Share” button visibility.
import com.appvirality.AppVirality;
import com.appvirality.CampaignDetail;
import com.appvirality.Constants;
import com.appvirality.UserDetails;
...

AppVirality appVirality = AppVirality.getInstance(this);
appVirality.getCampaigns(null, new AppVirality.CampaignDetailsListener() {
    @Override
    public void onGetCampaignDetails(ArrayList<CampaignDetail> campaignDetails, boolean refreshImages, String errorMsg) {
        // Get Word of Mouth campaign details from list of campaign details
        CampaignDetail womCampaignDetail = appVirality.getCampaignDetail(Constants.GrowthHackType.Word_of_Mouth, campaignDetails);
        if (refreshImages) {
            /**
             * Download and save WOM campaign images.
             * if you are using the AppViralityUI dependency
             */
            new com.appvirality.appviralityui.Utils(getApplicationContext()).refreshImages(womCampaignDetail);
            //If not using the AppViralityUI dependency copy the Utils class (https://github.com/appvirality/AppVirality-Android-SDK-2.0/blob/master/AppViralityUI/src/main/java/com/appvirality/appviralityui/Utils.java#L285-L301) and call the method "refreshImages()"
        }
        if (campaignDetails.size() > 0 && womCampaignDetail != null) {
            // Campaigns available, display Refer & Earn button or launch growth hack screen
        } else {
            // Campaigns not available, hide Refer & Earn button or display some message to the user
        }
    }
});
You can try out other methods available for introducing the growth Hack to the users.
Regardless of whichever button or event you would use to trigger the Launch of the In App referral Growth Hack screen, the empirical format to approach it would resemble the following code block.
import com.appvirality.appviralityui.activities.GrowthHackActivity;
...

Intent growthHackIntent = new Intent(MainActivity.this, GrowthHackActivity.class);
growthHackIntent.putExtra("campaign_details", campaignDetails);
growthHackIntent.putExtra("is_earnings", false);
growthHackIntent.addFlags(Intent.FLAG_ACTIVITY_NEW_TASK);
startActivity(growthHackIntent);
// The below method recordImressionsClicks() would record the Referrals launch event in our system
appVirality.recordImpressionsClicks(womCampaignDetail.campaignId, false, true);

Every campaign rule defined by you is designed and intended to kick in upon specific events. These events are user actions inside your app, which are critical to identifying that a user has onboarded successfully and hence is eligible for the reward. These events are triggered on actions like: Install, Sign-up, Transaction, and any other custom defined action suited to your app’s use case.
Registering these events (thereby communicating the same to AppVirality) is an essential part of the process to reward your participants (Referrer/Friend) in case of a successful event. This also helps us tally and arrange specific analytics like LTV of a customer, etc.
Fraud Prevention & Security recommendation
Please send conversion events from Server side using API Register Conversion Event and avoid using client side SDK callbacks “appVirality.saveConversionEvent()” to handle fraud/unwanted automated events. Please let us know once you have started sending conversion events from server side so that we stop honoring client side conversion events.
All the aforementioned events can be captured in the fashion as depicted in the following code block:
import com.appvirality.AppVirality;
...

AppVirality appVirality = AppVirality.getInstance(this);
appVirality.saveConversionEvent(event, transactionValue, transactionUnit, extraInfo, growthHackType, conversionEventListener);
Advice
Please update user details before sending any conversion event. This will ensure that the correct user details will be used to send reward notification. Upon successful conversion, web-hook will get fired with the provide user details.
If your app uses LogIn/LogOut feature, allowing multiple users to use the same device, you need to notify the same to the AppVirality SDK so that campaign and user related data should be cleared upon LogOut and hence enabling the device to be used by some other user. To know more about LogIn/LogOut use case click here.
Invoke the following method inside your Logout method to notify SDK of the logout event:
appVirality.logout();
Starting with Android 9.0 (API level 28), cleartext support is disabled by default, which won’t allow to make HTTP calls with cleartext data. Also, your app might be using network security configuration to restrict cleartext HTTP traffic for domains other than yours. AppVirality SDK v2.0.10 onwards all the API calls are HTTPS based so you won’t need this step but if you are using any older version, you will have to create a network security configuration file, declaring cleartext HTTP traffic to be enabled for AppVirality. For more detail please check Network security configuration.
Create a network security configuration file under res -> xml folder and copy the below code inside it
 <?xml version="1.0" encoding="utf-8"?>
 <network-security-config>
     <domain-config cleartextTrafficPermitted="true">
         <domain includeSubdomains="true">appvirality.com</domain>
     </domain-config>
 </network-security-config>
Now declare the above network security configuration file under your manifest’s application tag as
 <?xml version="1.0" encoding="utf-8"?>
 <manifest ... >
     <application android:networkSecurityConfig="@xml/network_security_configuration"
                     ... >
         ...
     </application>
 </manifest>
If you use Proguard with your application, there are a set of rules that you will need to include to get AppVirality to work. AppVirality will not function correctly if Proguard obfuscates its classes.
//proguard configurations
-keep class com.appvirality.** { *; }
-dontwarn com.appvirality.**
Integration Completed
That concludes the integration process. Now it is time to sit back and watch AppVirality in action.
Things You May Need next
You may have completed all necessary steps for the SDK integration, however, you may be in need of a couple or more things to proceed
You will be needing the Referrer details for a User from time to time, for a variety of use cases. You can get the referrer details from the SDK using the following code block
import com.appvirality.AppVirality;
...

AppVirality appVirality = AppVirality.getInstance(this);
appVirality.getReferrerDetails(new AppVirality.ReferrerDetailsReadyListener() {
        @Override
        public void onReferrerDetailsReady(JSONObject referrerDetails) {
            // Use referrerDetails json object returned here to get various referrer details
        }
});
Similar to the above case, there could be many instances of the User details being updated inside the app on multiple use cases.
Use the UserDetails class object (shown earlier) and execute the following code:
import com.appvirality.AppVirality;
...

AppVirality appVirality = AppVirality.getInstance(this);
appVirality.updateAppUserInfo(userDetails, new AppVirality.UpdateUserInfoListener() {
        @Override
        public void onResponse(boolean isSuccess, String errorMsg) {
            // isSuccess would be true if user info updated successfully, else would be false with some errorMsg
        }
});
Other sections you may need next
1. Display Welcome Screen
2. Using Custom Domain
3. Enabling Login/Logout
4. Push Notification Configuration
5. Web-Hook Configuration
6. Configuring GMail SMTP server
7. Configuring custom social channel
8. Configure Emulator/Root Device checks
9. Configure InviteContacts social action
10. Referrals Testing Guide
For advancing your integration to support more complex operations & use-cases, you should explore our Advanced Configurations section