Notifying your Users
A place to define and control the various ways to notify your app users about their earnings, conversions, etc.
AppVirality offers the added benefit of automating notifications to your users when they get rewarded or a friend of their joins via their referral link. We know how important this is and hence we serve you three ways to handle these!
You may fire away e-mails to your users for some predictable events.
We provide you with some templates which you may use readily.
However, you may also customize the template to suit your design sentiments 🙂
Doing all this is pretty easy!
Begin by adding/configuring an Email alias to send the mail notifications to users. Navigate to:
- App Details on your AppVirality Dashboard by clicking on left menu,
- Click on App Settings
- Switch to EMAIL tab
- Click on + Add
You will find a right slider pane with title “ADD/EDIT YOUR EMAIL ACCOUNT” as shown below:

| Fields | Description |
|---|---|
| E-mail account | Enter email id from which you want to send mail |
| Display name | Display name of email account |
| Host | The host name of the outgoing SMTP (Simple Mail Transfer Protocol) server, such as smtp.example.com. |
| Port | The port number used by SMTP server. Common port numbers for outgoing mail are 25, 465, and 587. |
| User Name | User name of SMTP server for authentication |
| Password | Password of SMTP server for authentication |
| Enable SSL | Turn on if SMTP server support SSL encryption |
Add the above relevant details & save. This will configure the Sender email for the mail notifications being sent to your users.

Configuring Gmail SMTP Server
To configure the Email Notifications, navigate to:
- App Details on your AppVirality Dashboard by clicking on left menu,
- Select the desired campaign from the available list (these are the ones which are either in Drafted or Live status, implying that these are the only ones which you may have created – even if partially)
- Click on More, an array of new options shall show up
- Click on Notifications
- Switch over to the Mail Notifications tab

Navigation: Dashboard >> App Details >> Select Appropriate Campaign and Click on More on the campaign card >> Click on Notifications >> Switch to Mail Notifications tab
Next
Scroll down through the screen and select the email template you need, and switch the Status as ON for that particular template. Then enter the other details as relevant.
You can see the preview of how your mail notification will appear to the user. Once you are done creating the template for your mail notification, click on the Preview button from below the mail template, which would show you how exactly your mail notification would appear to the user. With the help of Preview option, you can check the Mail Notification template’s content, formatting, etc and make changes to the template accordingly if required.
To ensure that your Mail Server and Mail Notification template have got configured properly you can send a test mail using the Test option. To do so, please follow the below steps:
- Click on the Preview button from below the Mail Notification template, this would open up the preview window.
- Click on the Test button on preview window.
- Enter the Email inside Test Email text box on which you want to send the test mail and click on Send button.
- Check the mail box for above entered email to view test mail.
You are free to set up as many or all of the notification types as you feel.
You can configure your own set of custom email templates too.
Remember to save after each such configuration.
Push Notifications are an effective method of communication when it comes to apps, as we all know well. Configuring your push notifications for AppVirality events is typically just as easy as setting up the email notifications.
Navigate to:
- App Details on your AppVirality Dashboard by clicking on left menu,
- Click on App Settings
- Switch to PUSH tab

Now, configure the push credentials for your app on the respective platforms.
Once above details are updated and saved, we will move towards configuring the appropriate template for your push messages.
Navigation:
- App Details on your AppVirality Dashboard by clicking on left menu,
- Select the desired campaign from the available list (these are the ones which are either in Drafted or Live status, implying that these are the only ones which you may have created – even if partially)
- Click on More, an array of new options shall show up
- Click on Notifications
- Switch over to the Push Notifications tab
Here, feel free to customize the templates and use the replacement tokens for the same.
Remember to Switch ON the template you wish to use. If you do not – that templates would not be active & hence not be sent to end users.

If you want to add extra parameters in the push message then you can add them in the Other section by giving parameter and value as shown in the below screenshot.
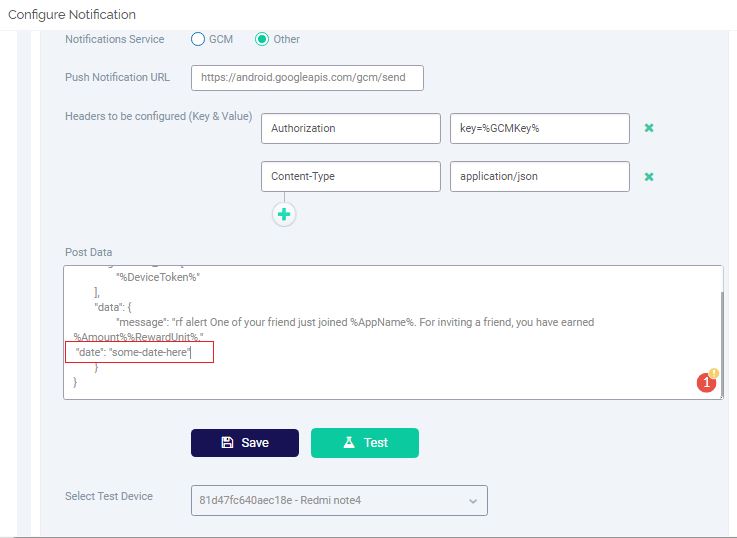
If you want to send push notification through third-party Push notifications provider (like Moengage etc) you have to use Other option. select the other option and provide the parameters required.
- Push Notification URL: Provide third-party notification url
- Headers to be configured (Key & Value): Provide if headers are required
- Post Data: Modify the post data as per your requirement and use the replacement tokens available
Once the push certificate details are updated and saved, we will move towards configuring the appropriate template for your push messages.
Navigation:
- App Details on your AppVirality Dashboard by clicking on left menu,
- Select the desired campaign from the available list (these are the ones which are either in Drafted or Live status, implying that these are the only ones which you may have created – even if partially)
- Click on More, an array of new options shall show up
- Click on Notifications
- Switch over to the Push Notifications tab
- Select iOS section
If you want to add extra parameters in the push message then you can add them in the APN section by giving parameter and value as shown in the below screenshot.

If you want to send push notification through third-party Push notifications provider (like Moengage etc) you have to use Other option. select the other option and provide the parameters required.
- Push Notification URL: Provide third-party notification url
- Headers to be configured (Key & Value): Provide if headers are required
- Post Data: Modify the post data as per your requirement and use the replacement tokens available

So we’ve already covered Web Hooks for Wallets right? Why again! & How for notifications?
Well, as it goes, the modus operandi for configurations of Web Hooks is same. Update the Private Key if desired, and update the relevant Web Hooks URLs for receiving the payloads.
Web Hooks can be used to deliver an immersive experience inside the app, like employing native app pop-ups, In-app chats, etc. Basically, the possibilities are endless for the creative ones among you out there!
About time now we saw how your Campaign is performing.