Your Apps
Your entry to the world of growth hacking your apps
THIS IS THE PLACE YOU SHALL BEGIN YOUR GROWTH CRUSADE FOR YOUR APPS
Once you login into your dashboard, you would be welcomed with a calm and affable interface to manage your organic growth campaigns.
ACCESSING YOUR APPS
Towards your left would be the hamburger menu that can pane out or collapse.
Herein, at the top you see the App which is currently selected.
Click on the Arrow near it and you shall see a new pane open up.
This pane is a scroll tray which lists all the apps you have in your dashboard.
Whenever you want to shift between apps for modifying campaigns relevant to another app (other than the one currently selected), use this pane to navigate to that particular app.

The Add New App button at the top of the Dashboard, shall help you add a new app under your account.
This is a very easy process to go about; since all you need is the Play Store URL for your Android app – to help pull & auto-fill most data fields.
After clicking over Add New App button you need to choose Product Type from the dropdown menu i.e., E-Commerce.

This is (sort of) like the haven for all campaigns relevant to an app in your account.
This is central to a lot of critical activities for your app.
- Find your app key here – you shall use it whilst integration with our SDK
- Download the latest SDK – anytime you plan
- Toggle between TEST & LIVE modes for your app
- Launch a new campaign
- Change app settings and other relevant details – like, Custom Domain, Private Key, etc.
- Navigate through to all your individual Campaigns under an app.
The More button on each campaign allows you to delve deeper into things like User Targeting, Advanced Settings (where you configure Mini/Pop-up notifications, redirection URLs, etc.), Landing Page & App Welcome Screen customization, etc.
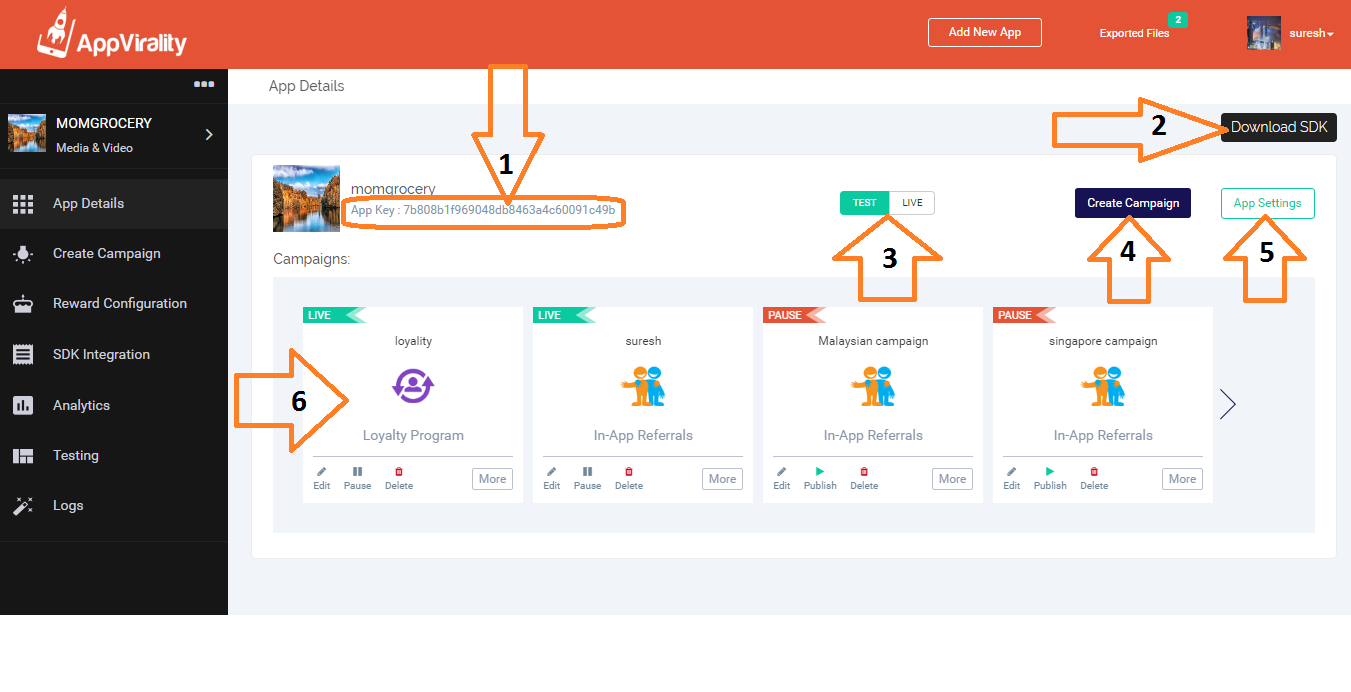
Each app has a specific set of additional settings, and this particular button (#5 in the above image) allows you to enable such customization. A lot of the navigation has been revamped from what it was earlier.
Navigation: Dashboard >> Scroll & Select appropriate app >> App Details >> App Settings button

The App Settings would now allow you:
- General – You can edit the basic app relevant information in this space like Name, Description, Category, etc.
- Links – Update the links to your app/product across all platforms from this space. Adding your app links for all platforms enables AppVirality to redirect link clicks to the relevant store front, based on the device OS from which a shared link is clicked upon.
For example, if an Android user shares your app with a friend who uses an iOS device – the shared link when clicked upon by the Friend would lead him to the App Store automatically. - Email – This is the place to update the email address from which Mail Notifications would be fired to your users when they earn rewards – conditional to the Mail Notifications being configured for your campaigns.
This feature was earlier embedded under the Notifications section of the Dashboard – which has now been redacted, and merged under Campaign level configurations for an app. - Push – Configure your app’s Push Notification credentials here, be it the Android GCM key or the iOS p12 certificate.
- Team – Add, Remove & grant/revoke access to your Team members.
- Advanced – This space enables 4 major functions for you:
Custom Domain: Add the custom domain name in this field and see your app referral links being shared with the custom domain configured here.
For example, add ‘share.myappname.com‘ and see your referral links flying as ‘share.myappname.com/yghl-12gh/2‘
Private Key: This is a Key generator that allows you to configure APIs & Webhooks between AppVirality & your servers securely
Facebook App ID: Add your Facebook App ID for the product, and enable seamless attribution of the posts/stories shared relating to your product on Facebook.
- Fraud Checks – This section contains various Fraud Checks which helps in running the Referrals safely and to cope with users who may try to get the rewards through some fraud mechanism, you can enable the checks which you want to be run for your app.

Below is a list of all the checks and the frauds which can be prevented using the same.
Fraud Checks Check Description Referrals from same IP It marks the reward as suspicious if Referrer gets more than 4 Friends from the same IP address. For ex, if Referrer gets 5 Friends and all of them have the same IP address. IMEI Checksum It validates the IMEI checksum and marks the reward as suspicious in case the user's device IMEI is invalid. Rooted Device Check It marks the reward as suspicious if the device used for referral is rooted. Please check the configuration document for implementation. Emulator/Simulator Check It marks the reward as suspicious if the device used for referral is a simulator/emulator, and not a real device. Please check the configuration document for implementation. Referral Rate It marks the reward as suspicious if Referrer gets more than 4 friends in an hour. Same Email Pattern It marks the reward as suspicious if Referrer and Friend have similar Email. Same IP Address It marks the reward as suspicious if Referrer and Friend have the same IP address. It is not recommended to enable this check as it would mark rewards as suspicious if Referrer and Friend are using the same network. Friends Email Pattern It marks the reward as suspicious if more than 2 Friends of a Referrer have similar Email addresses. Temporary Email Domain This check marks the user as suspicious if he/she has temporary Email domains.
This is in relevance to the TEAM tab in the App Settings described above. This would be a short note regarding the user roles & their meaning.
Administrator: Has full access to all section of the platform. Only an Administrator can add Team members.
Support: Has a Read Only access to Analytics & Logs. This is an appropriate user role for someone who is dedicated to monitoring the performance of the campaign only