Testing FAQs
Your testing journey, post integration of the SDK, would be mired in lots of questions – and understandably so.
Here you shall find a bunch of such questions which most other people have encountered commonly.
We are updating this section as you read this line. Thanks for your Patience!
More Questions shall soon be updated!
NO. You do not need a Live app on your store, to test your AppVirality SDK Integration with your app.
Note that during the test cycles, we have mentioned explicitly that you should use the Test App (i.e. the APK generated after your integration with the SDK) to run all your test cycles.
- Click & Follow on the Invitation Link
- Let it lead to the App Store or Play Store page. But do not download/install the app from that page.
- Instead install the Test App after you have reached the App/Play Store
When it comes to rewards, the possibilities are a handful. Thankfully, if you follow a systematic approach to troubleshooting the same, as has been stated below, you can find the root cause fast and get it resolved.
However, the modus operandi of troubleshooting will take an approach that should vaguely touch each aspect. In diligently implementing or checking the undermentioned steps, you shall uncover the issue or hit upon the epiphany of what is actually wrong.
Please take time to review all these steps before you conclude the issue is beyond all these – and needs us to intervene.
All rewards in under the campaigns in AppVirality are tagged to and triggered on Conversion Events only.
We have elaborated on what these events are & how to put them in place in the integration document already for both Android and iOS . We are hoping you have already implemented those recommendations.


Below Conversion Events explanation should help you understand what each implies.
Please note, most often, use cases will have the same order for these events’ occurrence, as has been discussed under here:
This event denotes that the installation of the app has been recorded for this device.
If your campaign rules are set such that users should be rewarded for simply installing, then this event should have triggered a reward for the particular influencer.
Check in the Rewards Tab in the same panel (device info), or navigate to the Referrer/Friends Tab (as applicable) to check the same.
This would denote that the user has completed the signing up & account setup activity within the app.
Assuming your campaign does reward users for such an activity, you should find rewards being issued for this event in the Rewards tab (toggle tabs to reach there).
This would imply, as per your app’s use case, a transaction was done inside the app – and the same has been registered for.
This should lead them to being rewarded, if such a campaign reward rule has been configured.
Check in the Rewards Tab in the same panel (device info) or navigate to the Referrer/Friends Tab (as applicable) to check the same.
Apps could have specific Custom Events defined under their experience that could be used as valid triggers for user activity/allegiance. AppVirality allows you to implement the same seamlessly. The same has been explained in the Integration document too.
A mention of the Custom Event in this tab implies it has been registered for the particular device, and hence the reward (if configured) should ideally be issued for the user too. Check in the Rewards Tab in the same panel (device info) or navigate to the Referrer/Friends Tab (as applicable) to check the same.
Having checked up all the above events, if you see that all seems to add up fine i.e. there are no discrepancies to any events being intercepted – the user could be subject to some campaign rule related issue.
Sometimes, the invite sent by a Referrer may miss attribution to the Friend who used this invite to join the app. In such cases, since the new user is not a Friend (in the eyes of AppVirality) you shall see no rewards flowing to either the Friend or the Referrer, on whatever action the Friend makes.
Note that this applies only to Referral growth hack. Loyalty would not have attribution issues of this kind.
On that note, assuming you are testing your Referral growth hack & are troubleshooting Rewards flow for the same – lets take a look at the causes, ways to replicate (thereby validate), and solve the issue of mismatch between Invite & Install.
This happens mostly due to network changes or when there are Proxies. When a user, clicks on the Invite Link and then by the time he installs the app, if there were network changes, such instances are possible.
for example: User gets invite link from his friend, clicks on it and while he is redirected to the Store to initate the app download – he observes his current network is slow. He chooses to find a faster network and then initiate the download or install. Thus, the Click was registered at one IP address, while the Install happened at a different one – even though the device & user are one & same.
How to solve this?
Solving this requires you to implement the INSTALL RECEIVERS and letting Google Install Referrer act as the fail safe for such cases.
The method of implementing the same has been covered during the Integration Steps: Add Install Referrer Receiver
Another option is to run a Referral Code based program, which will prompt the user to enter the Referrer’s Referral Code when the new user is signing up.
Check that the IP address attributed to the Link Click on the Invitation is same as that attributed/recorded for the App Installation in the Friend device. If the shared link was clicked upon and installed on the same device, then the IP for link click & the app install should be same.
Step 1 In the Influencer tab of the Analytics for your referral campaign, check Link Clicks tab under the Device Info(green info icon) for the Referrer, and record the IP Address for the Link Click that is attributed to the Friend device.
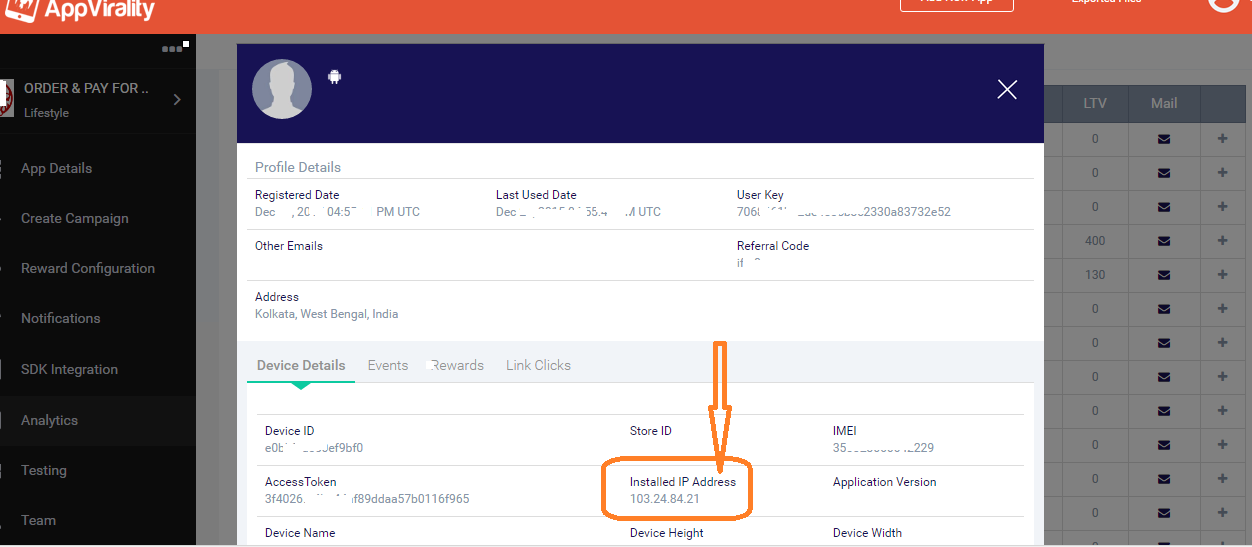
Step 2 Check the Installed IP Address, in Device Details tab under Device Info for the Friend, and compare it to IP Address recorded in above step
If they do not match, it implies there was a change in IP from when the click happened, to the when the app was installed. Hence the attribution is not honoured.
In case of iOS, cookie based attribution protects you from attribution leakage due to changes in IP.
Run on Two Networks- Ensure you are connected to WiFi when you click on the Invite link.
- Switch off your device WiFi and switch to mobile data now.
- Install the app now.
- Validate the difference between Click IP and Install IP.
This step will simply close the attribution loop for the scenario. Since two networks were involved, the IP changes would have left the install not attributed to the Referrer’s code/invite. This step will emulate what the Google Install Referrer does in a real life scenario.
Run the following in your Android Debug Bridge(ADB) command:
- adb shell am broadcast -a com.android.vending.INSTALL_REFERRER --es "referrer" "avclk=9480n-bigb175"
here:
“avclk = 9480n-bigb175” is the parameter, where 9480n is the Click ID and bigb175 is the Referral Code.
Run the Referral Link, for example: http://r.appvirality.com/type117-1k1/14, in the browser.
You would be redirected to the app’s webpage, since you have accessed via the browser. Obviously, you’d now have a new URL in your browser. The tail at the end of the new URL would have the avclk parameter, which basically is the click ID.

Use this to simulate the Install Referrer scenario in the ADB command.
Doing the above step would solve the attribution issue, which we procreated in the 1st step.
Sometimes, Rewards do not flow when the User is marked as an Existing User.
Note that often you may have missed out on some install & reset mismatch of the device, i.e. some improper order of installing the app, running a full cycle and then missing out on reseting the device.
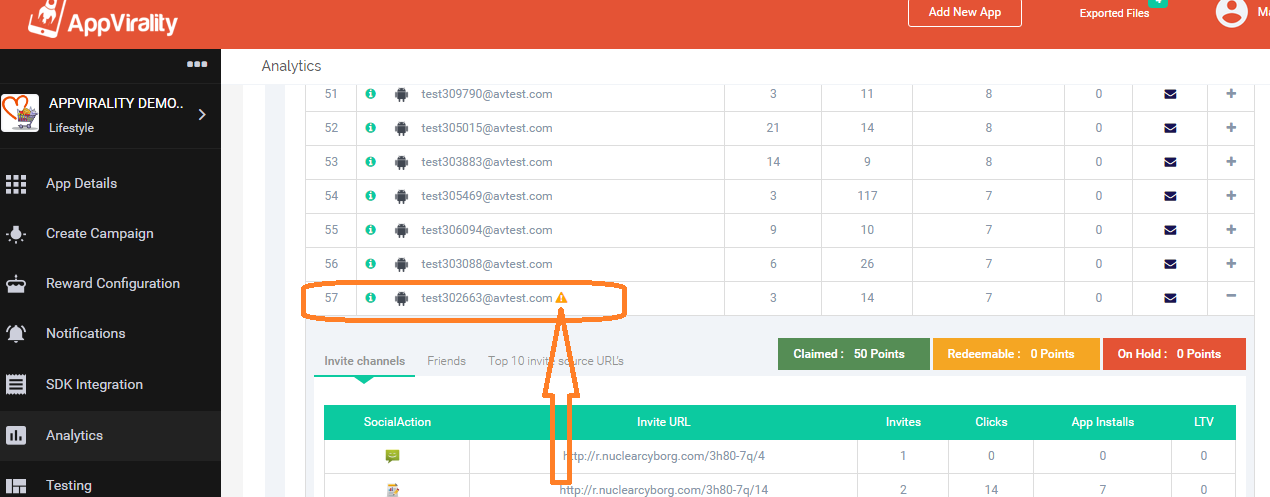
The best way to check this is to look for the device – in the Influencer section of Analytics for the campaign, and see if it has a yellow Warning icon (exclamation within a yellow triangle).
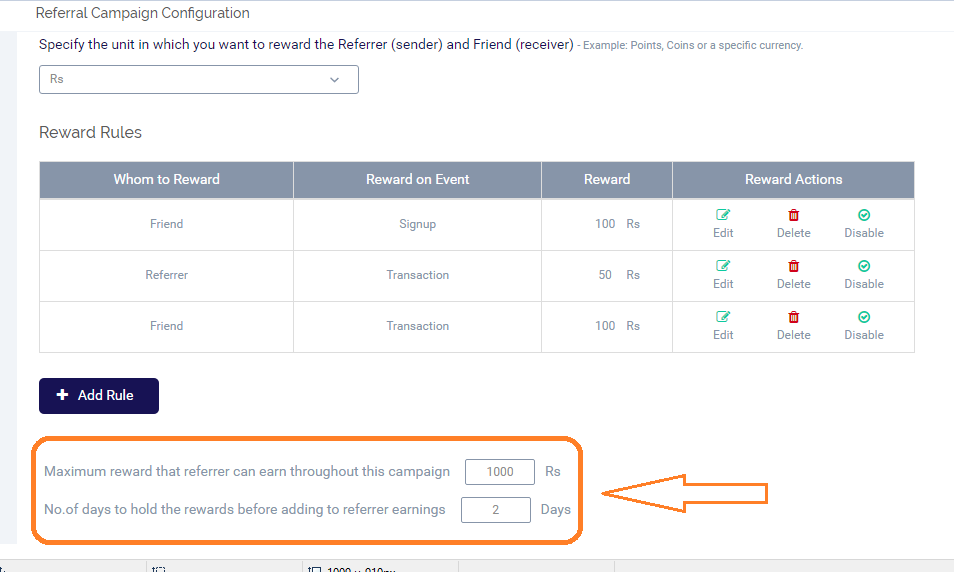
Check that you have configured the Reward Rules for which you are expecting the rewards to flow in for the particular user.
Navigation: App Details >> Edit appropriate Campaign >> Scroll down to rules
You have to check which stakeholder (i.e. Friend or Referrer) you are committing a reward to, and at what Event! This will be critical to the timeliness of rewards being issued to users. If the reward rules are in sync with your expectations to when the rewards should be issued to users, then you have more scope to investigate.
- Minimum Transaction
Your Reward Rules may been set to trigger on a minimum transaction commitment. Of course this is only applicable to any Transaction type events only.
Check if the transaction you made in the app, as part of your test scenario, aligns & honors these rules.
How to know which User's Events to check? - Redemption Cap & Minimum Review Period
If you you may have set a Redemption Cap, and the current user may have already earned Rewards beyond this Limit for the campaign – that’s another valid reason for rewards not being issued.
Similarly, if you have set a Minimum Review Period for the rewards, the rewards shall remain Under Review till that period elapses.
How to know which User's Events to check? - Fresh Cycle; Reset Device?
In case you are running a fresh cycle on the device, then you must ensure that you have already reset the devices. This would clear the old records and prepare the same device for similar cycles – as if they were fresh ones.

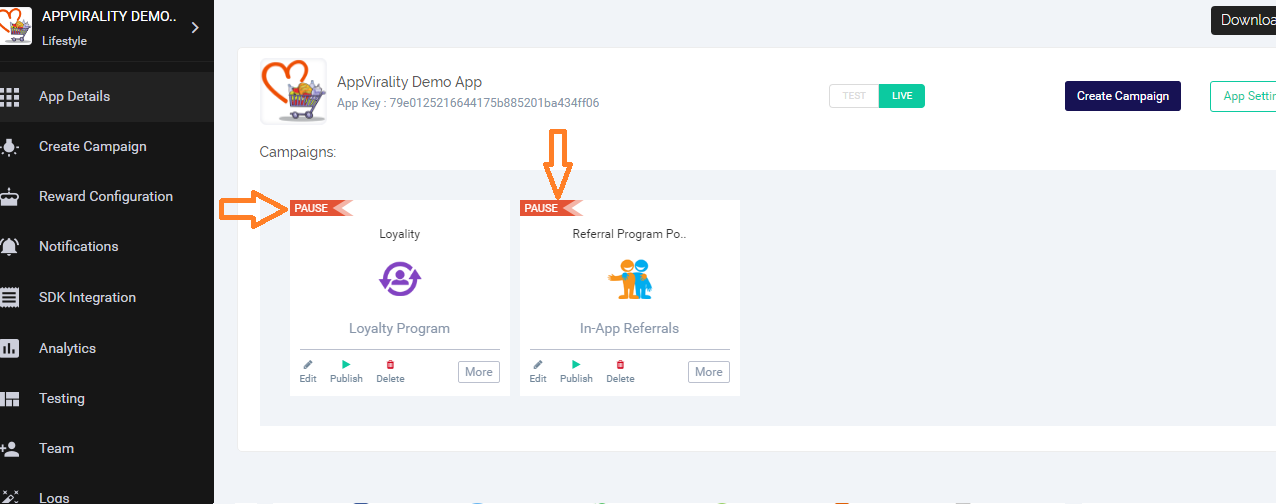
Often we have experienced such instances of Rewards not flowing across properly, in spite of all the above settings being proper, only to realize that the campaign was not active. So ensure that you have active campaign running, and that you may not have erroneously paused your campaign.
From all the above checks, if you still haven’t found the issue – it leaves us with the possibility of Rewards being configured incorrectly.
If your Reward Configuration is set to Wallet mode, and you are not seeing rewards flowing – then there is a chance your Webhooks are failing. This can be validated by checking up your Notification Logs for Web Hook Calls. Here you have a historical log jam of all Webhooks that fired from AppVirality and how they ended up: Success, Failed, etc.
Ideally AppVirality reattempts 5 times before giving up, when it comes to webhooks. However, you can always manually (or batch) re-attempt sending these webhooks.
This Reward Configuration type should not ideally stop the rewards from flowing. At best, if the coupon pools are empty, you would see rewards being issued & remaining in Approved state.
We have seen umpteen cases of developers & testers facing issue while adding a Test device. Some common issues that lead to problems will be covered here.
Often we have experienced such instances of ‘Test Device not added‘, in spite of all the settings being proper, only to realize that the campaign was not active. So ensure that you have active campaign running, and that you may not have erroneously paused your campaign.
Why is it so important?
When your campaign is not active, the referral screen i.e. the share intent screen as we cal it at AppVirality, is not accessible. This disconnects the SDK’s interaction with the App & device interfaces.
In all prerequisites we have maintained for Android & iOS testing, it is stated that the app’s Referral screen should be opened while adding a test device. While the device might get added despite the referral screen being open or not, it is the onus on the connection between SDK and servers at AppVirality that is driven by this activity.
We turn down almost all interactions between the SDk and our servers when campaigns are inactive, to improve and enable your app’s performance.
It has been specified explicitly that you make sure to set the APK in test mode, when you want to run a test device. Note the prerequisites for Android & iOS too.
Check your test app’s APK and validate that it is set in test mode.
Once you have finished the testing, you should set TestMode to “false” – and then push the APK as a Live or Ready-for-Production build.
If your device’s shake is not getting acknowledged by device, or being relayed through to our SDK, then our servers will not be able to identify the device & mark it up as a test device.
There could be a few possibilities to why this can happen; some being Faulty sensors in your test device, obfuscation of Shake event relays to the SDK, etc.
In case this is not resolved by a simple check, go ahead and use this alternative method to add your test device
Quite silly to call this out, but this is equally featured among the top reasons of why people fail to add test devices on our platform often. This happens when multiple stakeholders sign up on the platform and setup their own campaigns.
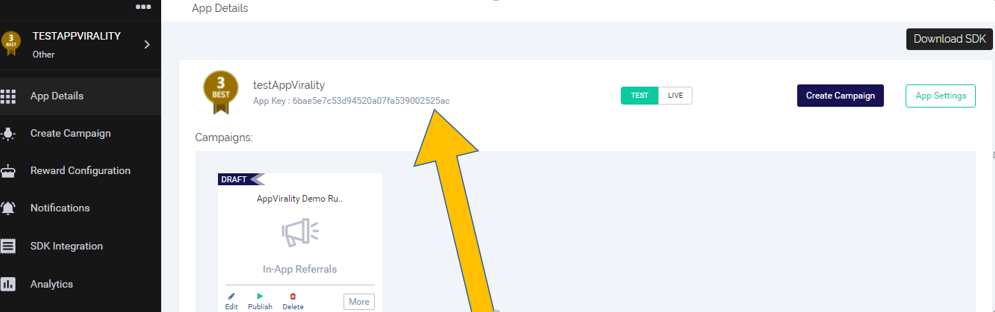
Ensure that the Campaign which you have defined as the final, shares the same App Key with the packaged test APK being used.
The activity of a Welcome Screen coming up is strategic in two ways. One: To truly uplift the on-boarding of a new user; Two: To ensure you can grab a new user with a call-to-action for signup.
But more importantly, it serves the purpose of enabling a predictable flow & order to the registration of Install and Signup events. So if you are missing the Welcome Screen – here is why it could be happening…
Ensure that you followed the steps to configure & setup you Welcome Screen, which is like the immediate activity after the integration of your app with out SDK.
If there isn’t any Welcome Screen configured, there is none to come up during the new user on-boarding!
The Welcome screen shall pop-up only when the user ID logged into the app turns to be a new one. This applies to Test devices too, so if you are running a test cycle on the device for the 2nd, 3rd or nth time – it is expected you have reset the device prior to beginning.
Note that often you may have missed out on some install & reset mismatch of the device, i.e. some improper order of installing the app, running a full cycle and then missing out on reseting the device.
The best way to check this is to look for the device – in the Influencer section of Analytics for the campaign, and see if it has a yellow Warning icon (exclamation within a yellow triangle).
In case you are running a fresh cycle on the device, then you must ensure that you have already reset the devices. This would clear the old records and prepare the same device for similar cycles – as if they were fresh ones.